Christopher P Day
cpday@cpday.com
cpday@cpday.com
We're finished!
Take a look...here.
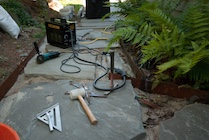
We're finally down to the details of landscaping the less-frequented areas of the yard.
Somewhat neglected during the earlier projects on this house has been the backside. This area is home to three of the air conditioning compressors, the gas meter, and the dryer exhaust. I also buried a drain pipe there that takes roof runoff to the north side lawn. Everything functioned well, but esthetically, it just never looked good.
Jayne had long wanted a hardscape walkway of some sort through this area. Fortunately, our son Austin is a stone mason that gets more experienced all the time. This walkway/garden area became their joint project.
Jayne and Austin settled on a flagstone walk with adjacent shade-tolerant garden spaces. Now when someone walks all the way around the house, it's finally a pleasant trip all the way.
This photo gallery covers this very satisfying project.

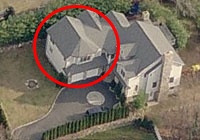
Perhaps it is a part of our changing climate or perhaps it is just normal for a coastal area, but there have been a spate of ice dam problems involving New England roofs. Hardly any house, it seems, has avoided them in the last decade. We decided that it was time to install a roof that would not be susceptible to ice damming.
Also, even a casual look around town will reveal that a very large percentage of homes with asphalt shingles have developed unsightly dark stains. Our house was no exception. It turns out that almost all roof shingles produced around the year 2000 are prone to this dark staining. We decided that it was time to install a roof that would not be susceptible to dark staining.
Finally, builders generally build houses with roof shingles guaranteed for 20 years. We thought that was just too short. We decided that it was time to install a roof that would would last much longer than normal.
One can't see much roof from the ground, but how about from the sky? How better to photograph a roof installation than from the air? Well, I just happen to be a newly FAA-licensed drone operator. So, this is one project that was actually shot from ABOVE. Take a look.
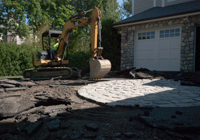
The driveway leading to our house was never up to our standards. It was probably paved in the rush of work that usually takes place when the builder wants to finish up and exit the premises. Paving, and throwing some builder's grass seed on some dirt, is the end of a long and difficult job. Who can blame them?
Combine the thin underbase with standard builder-grade asphalt and then throw in a decade and a half of rough winters, snowplows and hot summers and one can understand why it needs to be upgraded. So we decided to repave the entire driveway in a first-class fashion.
We gained the advice from a neighbor regarding a paving company that was up to the job. The neighbor pointed us to the guy that had recently done his driveway: Dorian Delgado, owner of Apex Paving & Sealing. After some conversations with Dorian and his visit to inspect the driveway, I was convinced that he was the high-standards, detail-oriented, creative kind of guy that we wanted.
Dorian's crew proved to be a fun and interesting group with which to work. Great care was taken to preserve the cobblestone center medallion that Austin rebuilt in 2011 as part of our general exterior masonry project. All the attention to details was hugely appreciated.
This photo gallery covers this project that required very little work from me (although I did get to repair the paving machine).
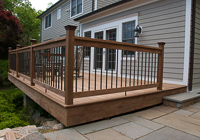
The original deck wasn't just ugly. It had become dangerous. It probably started out well enough. The decking, posts, railings and spindles were all cedar, which should have guaranteed a long useful life. However, there were three mistakes made that contributed to the deck's early demise. These were:
First, the previous owner (and builder) planted white pines around the deck that grew rapidly and placed the deck in eternal shadow and dampness.
Second, whoever laid down the cedar decking provided zero spacing between the deck boards, so there was no water drainage or air circulation.
Third, at some point, probably because the deck had started to discolor due to the first two mistakes, someone painted the deck with heavy gray paint. This sealed in the moisture and accelerated the rot.
By last year there were places where one's foot could easily go through the deck. Any of the railings could just as easily be pushed over. I patched up some of these safety hazards with quick and ugly pressure treated lumber, but the time had come to finally get this done the right way. That meant finding a real deck expert.
We knew that we wanted to use the tropical hardwood called ipe because we had such good experience with it at the shore house. We were happy to find people with all the right deck experience, a professional approach and access to skilled installers at (where else?) American Deck Company near Danbury, CT.
This project presented a special challenge for me: I had to let somebody else do all the actual work. That was a good thing, too, because working with ipe takes some very special skills.
This photo gallery covers this quick, but satisfying, project.

There were things that we liked about the original kitchen. There was a second sink in the island that had been very convenient. There was a handy butler's pantry. There were other positive features, just not a lot of them.
I don't mean to sound entirely negative. It's just that we have renovated or designed all of our kitchens in all of our previous houses over the last forty years. In this particular kitchen, we fixed a lot of things that were broken or were just too wrong to tolerate. The stupid Euro-metric dishwasher was replaced. The 800-pound, rusty Subzero refrigerator was relocated and then eventually replaced. We converted the useless kitchen desk into a more-functional base cabinet. We re-configured the center island.
Yet, at the end of this monkeying around, it was still someone else's design and construction. Things may have been in better working order, but they just weren't done the way we would have done them. And it was really DARK, DARK, DARK. We needed to turn this into a kitchen of our own design.
This project has been fun, but it has suffered from one of the worst cases of project "scope-creep" in our experience. Renovate the family room while we're at it? Sure! Replace the exterior trim outside the kitchen? Yeah, why not? Add a new central closet? No problem! By the way, that last suggestion requires replacing the butler's pantry.
This photo gallery covers this significant project.
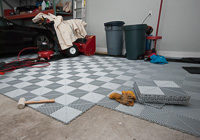
The Greenwich house had a pretty typical two-car garage, which is to say 'the usual junk threatens to completely displace the cars.' Ours was no exception, with lawn tools, car parts and a large snowblower taking up much of the available space.
Early on I upgraded the anemic incandescent lighting with a set of bright florescent tube fixtures. What this accomplished was to make all the other problems much more obvious. Besides the lack of useable shelves, the walls were in bad shape and the concrete floor was just ugly.
The most apparent additions were the big-box store-type industrial pallet racking and the SwissTrax brand Ribtrax polypropylene floor tiles.
This photo gallery covers this modest upgrade.
The wing of the house on the north side has never matched well with the south wing. Either wing might look fine alone, but when approaching the house, one encounters the fronts of both wings head-on and the incongruities are obvious. The rooflines clash, with gables to the right and a hip roof to the left. It is not a comfortable fit.
Inside of the north wing we also had the opportunity to improve the floor plan of the master suite. Sharing a single master closet amicably has been a challenge. There has also been a lot of poorly-used space, weird ceiling lines and nearly-impossible access to the north attic and the air handler.
We knew that we could easily mess this renovation up without the skills and discerning eyes of a residential architect. A general contractor was also needed this time due to the scale. Fortunately we were able to find both.
This photo gallery captures all the fun of this renovation.
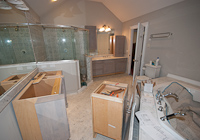
The master bath renovation has been like a subproject of the north wing. It could have been done at a separate time, but heck, we already made a huge mess, why not compound the problems?
The master bath needed more than anything some better cabinetry. New base and wall cabinets will replace the old ones. New panels will replace the old beadboard and the two return air vents that served as access hatches for the tub plumbing (probably to pass inspection 10 years ago). Of course, all that means some new plumbing.
I ordered a new vent fan for the bath about 18 months ago. I guess that I should install it now.
This photo gallery captures all the fun of this single-room renovation.

What could be less interesting than renovating the laundry room? Well, it does test our creativity and is sort of interesting, no? Oh, well.
The original laundry room was a design disaster, to the point of being useless for the purpose of ACTUALLY DOING LAUNDRY. Kitchen counters, kitchen fixtures, no place to hang anything... Did somebody have the wrong room in mind when they did this?
For such a small room, the laundry has a lot of design constraints and a lot of utility requirements (water, wastewater, drain venting, natural gas, dryer venting). How to make it all fit and work?
The solution came after months of rethinking the entire layout. Once I accepted Jayne's layout for the room, I still had to figure out how everything could be reversed, reconfigured, re-plumbed and rewired. The only items from the original laundry that actually got reused were the wall cabinets, and even they had to be remounted on the opposite wall.
This photo gallery shows the high-challenges-per-square-foot, single-room renovation.
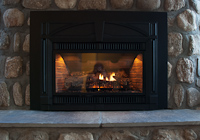
The house came with two wood-burning fireplaces. Both had been used heavily by previous residents. After getting the chimneys cleaned in 2010, I was not eager to dirty them up again and honestly, I had gotten the desire to burn wood out of my system several houses ago.
Jayne has long been enamored with gas fireplaces seen in commercial establishments and in magazines. After some reading I realized that she was on to something. They are nice on a chilly evening, incredibly convenient to light and there is no cleaning up after use.
Even before we purchased the house we had identified the family room fireplace as a likely place to install a gas-burning unit. That decided, there was an important choice: Would we install a gas log set in the fireplace and just let everything go up the chimney flue (easy) or install a sealed direct-vent heating unit (complicated)? Naturally we took the more difficult route.
What finally sold me on the more elaborate gas insert was the fact that it could provide heat to the home during an extended power outage, as Connecticut seems to have all too often. The idea that I could keep my pipes from freezing without any electricity won me over. I settled on a gas insert from a Norwegian manufacturer called Jotul.
This photo gallery shows the steps in getting this installed and running.

The original exterior masonry at the Greenwich house included a patio, some small retaining walls, makeshift stone pads for the air conditioning units, a crumbling driveway centerpiece and one dangerous set of stairs to the back yard. None of this was done well. All of it is being replaced.
In addition to the things that needed outright replacement, we also needed to add stairs from the driveway down to the basement walk-out door so that I have access to my shop. A flagstone patio at the bottom of the stairs will provide a solid outdoor platform for my table saw, etc.
Fortunately we maintained contact with Harold the mason. At the South Salem house we had hired Harold in 2006 to build a retaining wall, stairs and a walkway. His approach is hands-on, high quality and well thought out.
Just as fortunately, our son, Austin, is training to be a mason and needs both the experience and the work. No, we didn't plan it this way, but it works out well.
In this photo gallery the progress on this masonry work is followed.
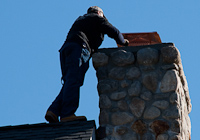
The Greenwich house has two interesting stone chimneys that serve the gas furnace and the two wood fireplaces. There were no records of them ever being cleaned. There were also no caps on the chimneys, meaning that rain fell directly into the fireplaces and the gas exhaust flue. Not a good situation.
Jayne has also been planning for a gas firebox in the family room. I certainly don't want that getting wet.
I fortunately had some good experience at the South Salem house with a reliable chimney service company. Using them I was able to get copper caps for the three flues, which should pretty permanently solve the rain problem.
Climbing onto the roof is something that I occasionally do, but not because I enjoy it. I was happy to let Anthony and Eric demonstrate their skills on the chimneys.
The copper caps are quite attractive. They will lose their shine pretty quickly, but will last a long time.
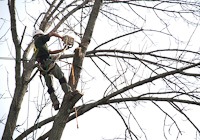
The Greenwich property was dominated by a very large Ash tree. The very large Ash tree was also very dead since sometime in 2009.
Theories abounded for the cause of the great tree's death. Some thought that it was the work of a foreign bark borer that had recently invaded New England. An arborist that I called in reported that a lot of ash trees were dying in the area, but that no one really knew the reason. A neighbor opined that the tree had been struck by lightning some years back and the damage had been fatal.
It didn't matter whatever the reason. The fact was that tree was going to come down either under some controlled conditions or in the next large Nor'easter. Due to it's size and location, an uncontrolled fall threatened up to three houses, including ours, with major structural damage.
The tree's location precluded getting a crane in to do the takedown. I needed a tree climber with a chain saw, a lot of skill and a lot of courage. I found one. Even though I wasn't the one up in the tree it was still a nail-biting experience.
There are things that can be fixed and then there are things that, practically speaking, can't be fixed. For me, property problems involving Himalayan-like topography, high water tables, aircraft takeoff and landing patterns, and major highways all lead candidate properties to the reject pile. This part of the country offers lots of properties for that pile. I won't touch them. On the other hand, bad plumbing, dumb floor plans, neglected landscaping, crumbling masonry and rotted windows can all be opportunities for us to fix things.
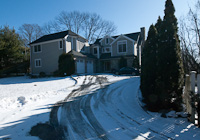
We spent three years looking for properties in Connecticut, including a demolition-only waterfront home and several promising houses that just presented insurmountable problems. We finally settled on this house in Greenwich. Make no mistake: The house has plenty of serious problems, but none of them require moving the house to a new location, petitioning the FAA for aircraft route changes or waiting for sea level to go down. The problems with this house all seem to be, well, surmountable.
The Greenwich house is our first one in years that is close to a real downtown area. It is located within walking distance of the train station, Town Hall, supermarkets and many stores and retaurants.
We now have all of those surmountable house problems. This is a house full of opportunities and these photos introduce some of them.